Kitchen sink repair: 5 Powerful DIY Tips for Easy Success 2025
Why Kitchen Sink Repair Skills Save You Time and Money
Kitchen sink repair is one of the most common plumbing tasks homeowners face, and learning basic DIY techniques can save you hundreds of dollars in service calls. As one busy homeowner finded, “Washing hands, filling glasses and pots, rinsing produce, doing dishes — the kitchen sink sees a lot of action.”
Quick Kitchen Sink Repair Guide:
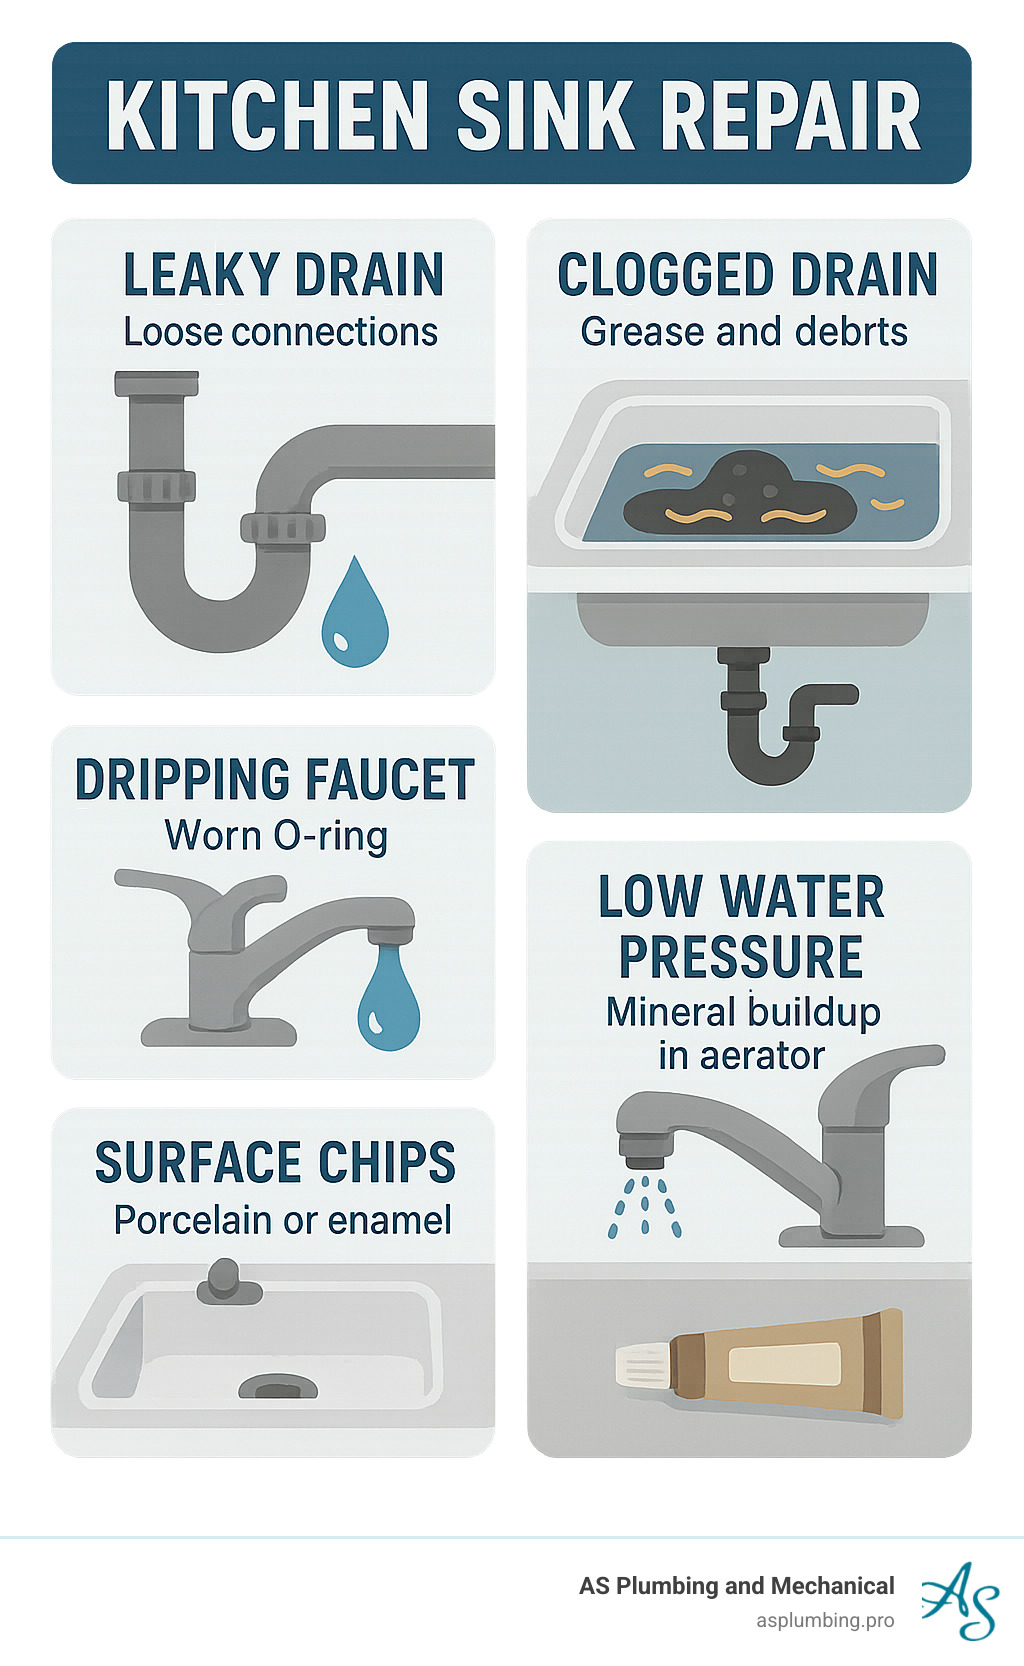
• Leaky drains – Tighten strainer nuts or replace gaskets with plumber’s putty
• Clogged drains – Use plunger, baking soda/vinegar, or cable auger
• Dripping faucets – Replace O-rings, washers, or cartridges
• Low water pressure – Clean mineral buildup from aerator
• Surface chips – Apply porcelain or epoxy repair kits
Most kitchen sink problems are surprisingly easy to fix yourself. Research shows that replacing a kitchen sink drain basket typically takes less than 1 hour for a DIYer, and basic repairs can cost just a few dollars in parts versus $100+ for professional service calls.
The benefits of DIY kitchen sink repair go beyond cost savings. You’ll gain confidence in handling future plumbing issues, avoid waiting for repair appointments, and develop skills that serve you for years. Plus, many repairs use simple tools you already own – like adjustable wrenches and plungers.
When emergencies strike – like a backed-up sink during dinner prep – knowing these techniques means you can restore your kitchen to working order quickly. However, it’s important to recognize when issues require professional help to avoid costly water damage.
Kitchen sink repair word guide:
– Advanced leak detection
– Plumbing fixtures installation
– Affordable drain cleaning
Identify & Diagnose Common Kitchen Sink Issues

Think of yourself as a detective when your kitchen sink repair project begins. The key to success lies in properly diagnosing what’s actually wrong before you start taking things apart. We’ve seen too many homeowners dive straight into repairs, only to find they were fixing the wrong problem entirely.
Your kitchen sink can develop several common issues over time. Leaks are probably the most obvious – you’ll notice water where it shouldn’t be. Clogs make themselves known when water backs up or drains slowly. Faucet drips create that annoying ping, ping, ping sound that drives you crazy at night. You might also notice stains around fixtures, musty odors coming from under the sink, low water pressure that makes filling pots take forever, or even mold growth if moisture problems have been hiding for a while.
Water damage from undetected leaks can be expensive, so taking time to inspect thoroughly now saves headaches later. Start by checking all the visible pipe connections under your sink for any signs of drips or moisture. Test your faucet operation and pay attention to how the water flows – does it seem weak or irregular?
Look for water stains on the cabinet floor or walls, which often reveal slow leaks that have been going on for weeks. Run water and listen carefully for any unusual sounds or gurgling that might indicate drainage problems. If you have a garbage disposal, check it for leaks or jams too.
Most kitchen sink problems fall into predictable categories that you can handle yourself with the right approach. The warning signs to watch for include persistent dripping sounds even when everything’s turned off, water pooling under the sink, slow drainage or complete blockages, rust stains or mineral buildup around fixtures, and musty odors that suggest hidden moisture issues.
When your inspection reveals problems beyond what you can easily see or access, professional help becomes valuable. For comprehensive leak detection that goes deeper than DIY methods, check out More info about Plumbing Leak Repair.
Pinpoint the Source of a Leak
Finding exactly where water is coming from requires some detective work, but it’s easier than you might think. The flashlight test works wonderfully – grab a bright flashlight and examine all the connections under your sink while someone else runs water above. You’ll be amazed at what proper lighting reveals.
Here’s a trick that works every time: the paper-towel method. Place clean paper towels under all the pipe joints, around the strainer flange where the drain basket meets the sink, along the supply lines, and near the shut-off valves. Run water for several minutes, then check which towels got wet. This eliminates guesswork and shows you exactly where the problem is.
Strainer flanges are common culprits – this is where your drain basket connects to the sink bottom. Supply lines (those flexible tubes connecting to your shut-off valves) can develop leaks at their connections. The P-trap connections – that curved pipe under your sink that prevents sewer gases from coming up – often leak due to loose fittings or worn gaskets. Shut-off valves themselves frequently develop leaks at the packing nut as they age.
P-trap pipes cause more under-sink leaks than any other component, usually because of corrosion or cracking over time. The good news? These are typically straightforward DIY fixes involving new gaskets and proper tightening techniques.
Red Flags That Signal Replacement, Not Repair
Sometimes the honest answer is that repair isn’t worth it. We’ve learned from experience that certain conditions mean you should replace rather than patch, no matter how tempting a quick fix might seem.
Extensive rust that’s actively spreading is like a warning flag you can’t ignore. Rust doesn’t stop – it keeps growing and weakening the metal until failure becomes inevitable. Worn enamel on porcelain sinks creates another replacement situation. Once that protective coating is compromised by harsh chemical cleaners or abrasive scrubbing, the underlying material becomes porous and impossible to keep truly clean.
Recurring blockages that keep happening despite your best clearing efforts usually indicate pipe damage or improper slope that can’t be fixed with simple repairs. Old fixtures over 15-20 years with multiple failing components often cost more to repair piece by piece than replacing entirely.
Stainless steel sinks with rust spots pose safety issues beyond just looking bad. The rust creates sharp edges and will continue spreading, eventually causing leaks that damage your cabinets and flooring. For porcelain sinks, once the enamel fails, bacterial growth becomes a real concern since you can’t properly sanitize the porous surface underneath.
Tools, Materials & Safety Prep for Kitchen Sink Repair
Getting ready for kitchen sink repair is like preparing for any home project – having the right tools and taking proper safety steps makes everything go smoother. After years of helping homeowners in Upland, Riverside, and surrounding areas, we know exactly what you’ll need to tackle most sink issues successfully.
Your essential toolkit starts with an adjustable wrench – a 10-inch size handles most applications perfectly. You’ll also want a basin wrench, which might sound fancy but it’s just designed to reach those awkward supply line connections tucked way back under the sink where your regular wrench won’t fit.
For sealing connections, plumber’s putty stays pliable much longer than silicone, making it ideal for drain connections. Teflon tape wraps around threaded pipe connections to prevent leaks. Don’t forget practical items like a large bucket to catch water during disassembly – trust us, there’s always more water in those pipes than you expect!
Safety gear protects you from the unexpected. Work gloves shield your hands from sharp edges and chemicals, while safety goggles prevent splashing during any pressure work. A good flashlight or headlamp is absolutely essential for under-sink visibility, and knee pads will save your joints during longer repairs.
Before touching any pipes, follow the proper shut-off procedure. Look under your sink for two shut-off valves – one for hot water, one for cold. Turn them clockwise until snug (don’t overtighten older valves). If these valves don’t work properly or start leaking when you turn them, you’ll need to shut off water at your main meter instead.
Ventilation matters more than most people realize. When using chemical drain cleaners or any solvents, open windows and run exhaust fans to prevent dangerous fume buildup in your kitchen.
When it comes to clearing clogs, you have three main options, and knowing which to use saves time and effort. Plungers work great for simple clogs with standing water – they’re inexpensive and give immediate results, though they can be messy and have limited reach. Cable augers tackle deep blockages and hair or debris buildup effectively, reaching far into pipes and lasting for years, but they require some technique and can scratch older pipes if used roughly. Chemical cleaners dissolve grease buildup well and are easy to apply, but they produce toxic fumes, can damage certain pipe materials, and raise environmental concerns.
| Method | Best For | Pros | Cons |
|---|---|---|---|
| Plunger | Simple clogs, standing water | Inexpensive, immediate results | Limited reach, messy |
| Cable Auger | Deep blockages, hair/debris | Reaches far into pipes, reusable | Requires technique, can scratch pipes |
| Chemical Cleaners | Grease buildup, maintenance | Easy application, dissolves organic matter | Toxic fumes, can damage pipes, environmental concerns |
Having everything organized before you start prevents those frustrating trips to the hardware store mid-repair. Check that you have the right sizes for your specific fixtures, and consider labeling parts as you remove them – it makes reassembly much easier when you’re working in tight spaces under the sink.
DIY Kitchen Sink Repair Step-by-Step
Kitchen Sink Repair Toolkit Check
Getting organized before you start any kitchen sink repair makes the difference between a smooth fix and a frustrating afternoon. I’ve learned this the hard way – there’s nothing worse than being elbow-deep in a repair only to realize you’re missing a crucial part!
Take photos of everything before you start. Your phone is your best friend here. Snap pictures of pipe connections, how parts fit together, and which direction things face. Trust me, reassembly becomes much easier when you can reference these photos later.
Measure twice, buy once – this old carpenter’s rule applies perfectly to plumbing repairs. Bring the old part with you to the hardware store whenever possible. Most kitchen sink drains use standard 1¼-inch diameter pipes, but every setup has its quirks.
Label parts as you remove them using masking tape and a marker. Write simple notes like “top gasket” or “connects to P-trap.” This simple step prevents the dreaded “mystery parts” situation where you’re left with extra pieces and no idea where they belong.
Clear out everything from under your sink and lay down some old towels. You’ll need room to work, and water always seems to find its way onto cabinet floors during repairs.
Fix a Leaky Drain or Strainer
That annoying drip under your sink is usually coming from the strainer connection – the part where your drain basket meets the sink bottom. The good news? This is one of the most straightforward kitchen sink repair jobs you can tackle.
Start by turning off your water supply at the shut-off valves under the sink. Remove any standing water from the sink basin using a cup or sponge – working in a dry environment makes everything easier.
The real culprit is usually old, hardened plumber’s putty. Over time, this putty shrinks and cracks, allowing water to seep through. You’ll need to remove the large locknut under the sink using a spud wrench or large pliers. Don’t worry if it feels stuck – these connections can be surprisingly tight.
Clean away all the old putty from both the sink hole and the strainer flange. This step is crucial because new putty won’t seal properly over old, dried material. Take your time here – a clean surface means a watertight seal.
Roll fresh plumber’s putty into a rope about as thick as a pencil and press it around the sink hole. When you insert the strainer from above, this putty will create a waterproof barrier. Press the strainer firmly into place, then tighten the locknut from below until snug.
Here’s where many DIYers go wrong: don’t overtighten that locknut! You want it snug enough to compress the putty and create a seal, but too much pressure can actually crack your sink. Wipe away any excess putty that squeezes out around the edges.
The Family Handyman basket-strainer tutorial provides excellent visual guidance if you’re more of a visual learner.
For larger plumbing projects or if you’re planning a kitchen renovation, our More info about Plumbing Fixtures Installation service comes with our one-year labor warranty for peace of mind.
Unclog a Kitchen Sink Drain

A clogged kitchen sink always seems to happen at the worst possible moment – usually when you’re trying to clean up after cooking a big meal. Before you reach for harsh chemical cleaners, try these gentler methods that work surprisingly well.
The trusty plunger works about 70% of the time and should be your first line of defense. Fill your sink with 3-4 inches of hot water, then position the plunger over the drain opening. If you have a double sink, use a wet rag to completely seal the second drain – this prevents air from escaping and makes your plunging much more effective.
Give it 15-20 vigorous pumps, then pull the plunger away quickly. The suction created often pulls loose whatever’s causing the blockage. You might be surprised by what comes up!
For a natural approach that’s safe for all pipes, try the baking soda and vinegar method. Pour one cup of baking soda down the drain, followed by one cup of white vinegar. The foaming reaction helps break down grease and organic matter. Cover the drain with a stopper or wet rag for 30 minutes, then flush with boiling water.
When you need more aggressive action, a cable auger (also called a drain snake) can reach deeper blockages. You might need to remove the P-trap to access the drain line directly. Insert the auger cable until you feel resistance, then rotate and push to break through the clog. Pull back slowly to extract hair, food debris, or other nasty stuff that’s been lurking in your pipes.
Here’s when to call in the pros: If multiple drains in your home are backing up at the same time, you’re likely dealing with a main line blockage that requires professional equipment. Our More info about Drain Cleaning service uses high-pressure water jetting and video inspection to clear even the most stubborn blockages.
The This Old House clog-clearing guide offers additional techniques if these methods don’t solve your particular clog situation.
DIY Kitchen Sink Repair: Faucet & Fixture Leaks
That persistent drip from your kitchen faucet isn’t just annoying – it’s literally money going down the drain. A single dripping tap can waste over 3,000 gallons per year, which definitely adds up on your water bill.
Most faucet leaks come down to worn-out internal parts that cost just a few dollars to replace. The tricky part is identifying what type of faucet you have, since the repair process varies depending on whether you’re dealing with a compression, ball, cartridge, or ceramic disk faucet.
For older compression faucets (the kind with separate hot and cold handles), start by shutting off the water supply at the under-sink valves. Remove the handle by unscrewing the packing nut, then lift out the stem assembly. The usual suspects are worn O-rings and seat washers – bring the old parts with you to the hardware store to ensure you get the right size.
Ball, cartridge, and ceramic disk faucets require replacing the internal cartridge or ball assembly. These parts are manufacturer-specific, so taking photos before disassembly really pays off here. Each brand has its own quirks and assembly methods.
Low water pressure often signals a clogged aerator rather than a serious plumbing problem. Unscrew the aerator from the faucet tip (turn counterclockwise), then disassemble the parts and soak them in white vinegar for several hours. The mineral deposits that build up over time – especially common in our hard water areas around San Bernardino County – dissolve away with a little patience and an old toothbrush.
Handle re-seating becomes necessary when the valve seat itself gets scored or damaged. This requires a special seat-dressing tool, but it’s still within DIY territory if you’re comfortable with the process.
DIY Kitchen Sink Repair: Surface Chip & Crack Patching

Don’t write off your sink just because of a chip or small crack. Modern repair kits can make surface damage nearly invisible when applied with a little patience and attention to detail.
The key to a successful repair is proper surface preparation. Clean the damaged area thoroughly with acetone or a strong degreasing cleaner to remove any soap residue, grease, or grime. Lightly sand around the chip to create a slightly rough surface – this gives the repair compound something to grip onto.
Work in thin layers rather than trying to fill the entire chip at once. Mix your repair compound according to the package directions and apply it gradually. Each layer needs to cure completely before you add the next one. This might test your patience, but rushing this step leads to repairs that crack or peel off later.
Color matching takes some finesse. Take a photo of your sink in natural light and bring it when shopping for repair kits. Many kits include multiple tints that you can mix to get closer to your sink’s exact color. The repair might not be completely invisible, but it should blend well enough that you have to look for it to notice it.
For stainless steel sinks, minor scratches often buff out with specialized compounds. Deeper gouges might need professional refinishing, but surface-level damage usually responds well to DIY treatment.
Popular repair options include porcelain repair kits for ceramic and enamel surfaces, fiberglass repair kits for composite sinks, and waterproof epoxy putty for structural repairs. These typically cost $15-30 compared to $200+ for professional refinishing – a significant savings for a repair that can last years when done properly.
The cure time varies by product, but most repairs need 24-48 hours before they’re fully waterproof. Plan accordingly if this is your only kitchen sink!
Frequently Asked Questions about Kitchen Sink Repair
How do I know when to use a plunger, auger, or chemical cleaner?
Start with a plunger for any clog with standing water – it’s your safest bet and surprisingly effective. About 70% of kitchen sink blockages give up after a good plunging session. The secret is getting a solid seal around the drain and using quick, forceful pumps that create pressure changes to dislodge whatever’s stuck down there.
Move to an auger when plunging doesn’t work or when you’re dealing with clogs that keep coming back. Cable augers are like sending a tiny snake down your pipes to physically grab or break through stubborn blockages. They’re particularly good at pulling out hair clumps and solid debris that laughs at your plunging efforts.
Save chemical cleaners for last – and honestly, we’d rather you didn’t use them at all. They’re harsh on your pipes, toxic to breathe, and surprisingly ineffective against grease clogs (which are super common in kitchen sinks). If you absolutely must go the chemical route, choose enzyme-based cleaners over the acid-based ones that can eat through your pipes.
Never mix different cleaning products – chemistry class taught us that mixing cleaners can create dangerous gases. And here’s a critical safety tip: never plunge after using chemical cleaners because splashing caustic chemicals can cause serious burns.
What safety precautions should I take before starting?
Always turn off the water supply first – this seems obvious, but you’d be amazed how many weekend warriors skip this step and end up with an impromptu kitchen flood. Even tiny leaks can quickly soak through cabinet floors and damage your flooring.
Gear up with proper safety equipment before you start. Gloves protect your hands from sharp pipe edges and nasty chemicals, while safety glasses keep splashing water and debris out of your eyes. Trust us, getting drain water in your eyes is not a pleasant experience.
Open windows and turn on exhaust fans when working with any chemical products. Those fumes can build up quickly in the confined space under your sink, and nobody wants to feel dizzy while wrestling with pipe connections.
Keep kids and pets out of the work area – curious little hands and paws don’t mix well with tools and cleaning chemicals. Plus, you need space to maneuver without worrying about stepping on anyone.
Have cleanup supplies ready because kitchen sink repair almost always involves some water spillage. Keep plenty of towels and a bucket within arm’s reach for those “oops” moments when connections let loose unexpectedly.
When is it smarter to call a plumber instead of DIY?
Some problems are definitely beyond DIY territory and trying to tackle them yourself can turn a manageable repair into an expensive disaster. Multiple drains backing up at once is a red flag that screams “main line problem” – this requires professional equipment like sewer cameras and high-pressure jetting that most homeowners don’t have lying around.
No water pressure throughout your entire house suggests supply line issues that go way beyond your kitchen sink. Similarly, persistent sewage odors after cleaning might indicate venting problems or main line issues that need professional diagnosis.
Electrical problems near water sources require immediate attention from licensed professionals – water and electricity make a dangerous combination that’s not worth risking your safety over.
You’ll know you’re in over your head when repairs start requiring cuts into walls or floors, when gas lines are involved, or when your local building codes require permits. And honestly, if your initial repair attempts make the problem worse, it’s time to wave the white flag and call in the pros.
At AS Plumbing and Mechanical, we actually encourage homeowners to try DIY repairs first for simple issues – it saves everyone time and money. But when things get complicated, our 24/7 emergency service covers Upland, Claremont, La Verne, Glendora, and surrounding areas with the expertise to fix what went wrong.
There’s absolutely no shame in calling a professional when you’re unsure about something. Water damage from failed DIY repairs often costs way more than hiring a plumber would have in the first place – and that’s a lesson nobody wants to learn the hard way.
Conclusion

You’ve now got the tools and knowledge to tackle most kitchen sink repair challenges with confidence. Whether it’s replacing a leaky strainer with fresh plumber’s putty or clearing stubborn clogs with the trusty baking soda and vinegar method, these skills will serve you well for years to come.
The best part? Most repairs cost just a few dollars in parts compared to $100+ service calls. That leaky drain that’s been driving you crazy? Probably a $5 gasket replacement. The faucet that drips all night? Often just a $2 O-ring. You’ll literally save money from your very first repair.
Smart prevention beats emergency repairs every time. Installing quality sink strainers catches food debris before it becomes a clog. Running hot water for a minute after doing dishes helps flush grease buildup from your pipes. Taking five minutes each month to peek under your sink for early signs of leaks can prevent major water damage down the road.
Regular aerator cleaning keeps water pressure strong, especially important in our hard water areas throughout San Bernardino County and Riverside County. It’s amazing how much better your faucet works after removing all that mineral buildup!
Of course, we know when to wave the white flag too. When multiple drains start backing up or you smell sewage odors that won’t go away, it’s time to call in the cavalry. That’s where AS Plumbing and Mechanical comes in – we’re available 24/7 across Upland, Riverside, and all our service areas for those moments when DIY just isn’t enough.
Our family-owned business believes in empowering homeowners with knowledge while being there when you need professional expertise. Every repair we complete comes with our one-year labor warranty because we stand behind our work. Whether you’re in Corona, Fontana, or anywhere in Los Angeles County, we’re just a phone call away.
For bigger plumbing projects beyond basic sink repairs, check out our complete More info about Plumbing Services to see how we can help maintain your entire home’s plumbing system.
Every professional plumber started somewhere – probably fixing their own kitchen sink! With the right approach, basic tools, and safety precautions, you can handle most issues yourself. And when you can’t? Well, that’s what we’re here for.